I like to break rules, especially one like this. The many photographs of the setting or rising sun is one example that shows that I am not alone here. Sunlight filtering through the trees will also wreak havoc on images that are made with lenses that are prone to flaring. Lots of times these images are taken just before sunrise or just after sunset to avoid flare. If I like the light and composition I will typically shoot right into the sun if necessary to get what I want, then fix it later. There is a mood, an element of "drama" that results when you shoot into the light in these conditions that is hard to capture if you simply follow the rules. You can fix certain "features" in postprocessing, but you can forget about a bad composition that results from trying to avoid shooting into the light.
Needless to say, there are some obvious challenges here. First is the amount of light coming from the sun. It will fool your meter and make everything go to silhouette if you are not careful. HDR (covered in my earlier post) will take care of extremely wide contrast range and you can work in Photoshop using a combination of tools to tame down the flare.
Flare has two components. A strong color cast and a change in luminance.Where the flare occurs will determine how I go about fixing it.
Flare in an evenly toned sky or detail-less surface is the easiest. Just create a duplicate background layer and use the patch tool to select an adjoining area of sky and move the patch over the area that needs to be fixed. Done!
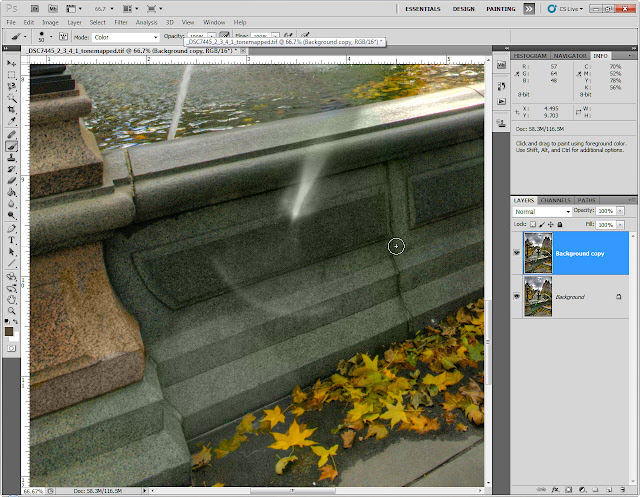
Flare that shows up in detail areas is more difficult. Here I employ a two-step process. First I remove the color cast. I start by creating a duplicate layer and selecting it, then I select a brush from the tool palette,
change the brush's blend mode to color;
then I select the eyedropper tool;
and and its sample size to 11x11 pixels;
I then select the brush tool again, and using the right click to enable the eyedropper, I sample a similarly colored area to use as my brush color.
I then paint over the flared area until all the green, yellow or magenta (or other color) is "neutralized." By using the color blend mode on the brush, the detail and texture is left intact, and I am only replacing colors.
Now you see it,
and now you don't!
At this point I usually flatten the layers once I am satisfied with the color removal. My second step involves adjusting the difference in luminance and/or reconstruction of the brighter area.
I decide what tool to use - content aware fill, clone, patch, or burn-in based on the type of repair I intend to make. If there is detail and the difference in tone is not that bad, I will burn in the area, which is the way I went with on this image.
Photoshop provides a dodge and burn tool, which lets you limit its effective range to shadows, mid-tones or highlights. I usually bypass this and create a new "dodge and burn" layer, fill it with 50% gray, set the blend mode to overlay or soft light, and use a black brush set at 15% opacity and 15% flow. I paint directly on the 50% gray layer. This darkens the area smoothly with minimal effect on color saturation or hue. The reason this works so nicely is that both overlay and soft light are contrast enhancing, but the closer to middle gray the tone is the less the effect. Anything that is middle gray is completely transparent to the layer below it. It is easy to build up density with black or white and be very precise about where you are dodging and burning. If you want to check your progress, turn the gray layer' visibility on and off. If you have to back off on an adjustment, use the opposite color brush - white to fix black mistakes and vice versa. If you don't like at all what you have done, just delete the layer and start over again.
Here is the final image:


No comments:
Post a Comment