Wednesday, June 13, 2012

FastStone Image Viewer and EXIFTool Mini Reviews

Several months ago purchased a Fuji Finepix 600EXR on the strength of several online reviews I had read. For $250 I got a camera that had a sharp 15X wide angle zoom, built in GPS with Landmark Navigation, 16 megapixel resolution, a larger sensor with better high ISO performance, full HD video at 30 fps, Fuji’s proprietary EXR dynamic range enhancement technology and RAW file output capability – all in a shirt-pocket sized package. For me, the last feature was most important as I shoot RAW 99% of the time.

And therein was the rub. When I purchased the camera last December, Adobe Camera Raw had just added support for the Fuji RAW file format used in this camera. But unlike NEF – Nikon’s format – I could no longer view thumbnails in Windows Explorer. There was no CODEC available. A CODEC is a software program that "codes/decodes" image and video files - compresses them to store on a drive then decompresses then to view. Without an appropriate CODEC, Windows cannot dislpay thumbnails or open the files in any of the Windows image viewing utilities. 

I like to view thumbnails in Explorer, and sometimes use software other than Photoshop, using a right click and “open with”  to edit images. In my search for a folder-style, Windows Explorer-like quick and easy file viewer I stumbled upon the FastStone Image Viewer. This tight little application offers a veritable cornucopia of useful features that I think many of you will be able to make use of, and it can display RAF files – and just about any other graphic image format I can throw at it.


FastStone Image Viewer Main Screen


I have incorporated it into my workflow, using it to view and cull bad images after importing the contents of my memory card to my computer. It has a very convenient folder/thumbnail/preview screen that resembles Windows Explorer and lets you find things very quickly using the thumbnail view, or in the folder list.


A single click on the preview will show you a magnified view in the preview.

With a double click on the preview you can see a full screen image,


then another click brings you to a 100% view of the image.

As you can see, it can quickly display four different image magifications about as fast as your finger can click the mouse buttons.

Panning and zooming is instant – you only need to left click and drag. The application loads quickly and has an extremely intuitive interface with extensive use of the right click on an image to access key features, making it a very snappy application.

FastStone Image Viewer can read most raw file formats - CRW, CR2, NEF, PEF, RAF, MRW, ORF, SRF, ARW, SR2, RW2 and DNG, as well as graphic file formats – JPEG, BMP, GIF, PNG, TIFF, PCX, TGA JPG2000, PSD, EPS, WMF, CUR, ICO. It can take any of the above formats and convert them to JPEG, BMP, GIF, TIFF PCX, TGA, JPEG2000 and PDF.

Image manipulation tools include lossless rotation/flip, resize/resample, crop, sharpen/blur, adjust lighting/curves/levels/colors,red eye removal, clone stamp, healing brush, etc.

FastStone offers powerful batch processing for renaming, resizing and image format conversion. When resizing for web, the algorithms are so good that it is almost impossible to tell between the low and high res image at screen resolution.

Right Click on Image Flyout Menu
Right clicking on an image reveals a flyout menu that allows you to launch the image editor(s) of your choice, view a full screen image, start a slide show, open the containing folder, delete/copy/move/email/print the image, create a new folder and view file properties.

Tool Flyout Menu

The Tools selection has its own flyout that allows you to access batch convert/rename, change timestamp, jpg lossless rotate, remove jpg metadata, compare images and create a wallpaper image.

The main menu offers a number of timesaving features – image capture from scanner, screen capture, image import, create/edit a slide show or contact sheet, view histogram and file properties, configure and launch the image magnifier, tag images, and a range of useful quick editing tools. You can also annotate and add special effects/watermark/border/frame mask.

This application has become an integral part of my workflow – from importing images from my memory cards, to resizing images for posting on Facebook or on my website. The best part is that is costs nothing for non-commercial use.

EXIFTool by Phil Harvey is another application that serves a unique function that I have come to rely on. When I need to see details about an image, ExifTool offers the complete list, and serves it up quickly. All the particulars of the camera and lens combination that was used to record the image, the metadata, can be viewed for every image that has it attached. It can read, write and edit the metadata, including almost all image tags found in EXIF, GPS, IPTC, XMP, JFIF, MakerNotes, GeoTIFF, ICC Profile, Photoshop IRB, FlashPix, AFCP, ID3 and others from a wide variety of image formats. Data can be output in various formats. You can fix timestamps, rename files, extract saved thumbnails, previews and large JPEGs from RAW files. It has many, many more features that you can read about on Phil Harvey’s site.

For those who are comfortable with DOS-level command line operation, the basic EXE file might be all you need. You can download it here. Instructions for opening and installing the Windows executable file can be found here.  For those of you who prefer a more familiar graphic interface and are using Windows 7, the author has provided a Windows-friendly shell that offers a few more bells and whistles that you can download here.


Monday, April 23, 2012

How to "Miniaturize" A Photo


Is this real or a scale model? Fooled ya, didn't I? No, this is not a scale model you are looking at, but a real-life scene taken at an upstate apple farm a couple of years ago. Using some image manipulations in Photoshop it is possible to create the impression that something is very small using something that is very big.

When looking at a photo, the visual cortex interprets various cues in the image to give the viewer a sense of scale, proximity and space, as well as a sense of live reality. Among them are depth of field, color saturation, the rate of sharpness falloff from front to back, lighting intensity and direction, contrast , point of view - to mention a few.

Depth of field is an important clue. Images of large areas with great depth that are sharp from foreground to background suggest a large space, and you are, in a sense, removed from the immediacy of the setting. Sort of like looking through a window onto the scene. A very shallow depth of field suggests intimacy and closeness where distances are measured in inches and fractions of inches.

Using a point of view  that looks down enhances the impression of smallness, since scale models are rarely seen at what would be ground level (in scale, of course).

Color Saturation is another important cue. In scale models colors are highly saturated and vibrant. Model making materials and colorants usually come this way. But another contributing factor is the intense, directional light that models are often viewed under.

Models of exterior spaces in particular lack the diffuse skylight and "radiosity" that enriches illumination in real life. In simplest terms, radiosity is the diffuse light that is reflected from surfaces in a scene. And this light can be either direct or reflected as well.  Think of sunlight coming through a window - there is a shaft of light falling on a wall or a floor, but the entire room is illuminated, even dark areas under tables and chairs, and shadows are very soft in areaas that are not directly lit. By increasing the contrast the impression is created that there is a single strong and directional light source. Here are a couple of illustrations that might help to explain this phenomenon. The first is an example of ray tracing vs radiosity in a computer generated image, the second is a series of examples when radiosity is progressively applied to a simply lit image.

borrowed from Wikipedia article on radiosity http://en.wikipedia.org/wiki/Radiosity_(computer_graphics)


borrowed from Wikipedia article on radiosity http://en.wikipedia.org/wiki/Radiosity_(computer_graphics)


I've created a simple tutorial that explains how to create a "miniaturized" scene in Photoshop. Load an image that has a high vantage point, some foreground and background, and a focal point in the middle. Here I will be creating a plane of focus that includes the two buildings in the middle left, and the orange tree in the middle right.


I Press Q or select Quick Mask Mode. I use this to define the areas that will receive a lens blur filter and those that won't.


I Select The Gradient tool, or press G. This will apply a graduated mask, with a maximum density that will hold back the blur effect which fades to clear, allowing the full effect to be applied to the image.


I pick the Mirrored Gradient tool option. This will create a blurred area above and below the center, with the effect fading to zero in the exact middle, much as how a lens with limited depth of field would record the image.


The kind of mask I will use will fade the foreground color, black to background color, white. Check to make sure these are correct at the bottom of the toolbar.


I left click in the center of the image, the area that I want to be in focus. Holding the mouse button I press Shift to restrict cursor movement to 90 deg vertical, and drag upwards. This will be mirrored, so the amount of movement up is duplicated below the starting point. When I release the cursor, I see a band of red, the default mask color, with the greatest density horizontally across the image at the starting point of the drag and click operation.


I press Q to remove the mask, revealing the "marching ants" designating the areas that will be blurred.


I use the lens blur filter to create a realistic blur in the image.Here its best to play with the settings in preview. A word of warning - the more realistic you want the blur effect you are looking for, the longer it will take to process. The preview really helps here.


When I get it the way I want, I click OK and take a break while Photoshops calculates and applies the effect.


Scale models use materials that have highly saturated colors, so I open the image adjustment Hue Saturation and Lightness command and kick up the saturation a bit. While I am here, I make a slight adjustment to the brightness level.


Last finishing touch is to apply a little vignette in the Lens Correction filter.


It's that easy! Except for the lens blur calculation, it doesn't take much time at all.

Here is another example.


This is a lot of fun, plus it gives you a chance to explore some features in Photoshop that you will be able to use in other situations. Enjoy!


Wednesday, April 4, 2012

Remove a Color Cast Part II (Threshold Layer)

In my January 27th post I described a way to remove a color cast by using Blur Average to establish an overall average color for a copy of the image, then switching to the original image and using a middle gray eyedropper in a Levels adjustment to sample the averaged image to reset middle gray in the original. This is a simple method that works in many but not all situations. There are times when a color cast is desirable. Sunsets/Sunrises, fireworks, night scenes, etc usually do not need or do not benefit from color balance correction.

Another method I often use actually does two things in one step. It balances the color to neutral and it also establishes a complete tonal range for the image, ensuring that there are black and white areas. The typical candidate for this image is one that has a color cast and is properly exposed, but has a histogram that is completely between and not touching the boundaries. By using a threshold adjustment layer it is easy to find pure black and pure white, then use the sampling eyedroppers in either Levels or Curve adjustment layer to set the corresponding black and white points. In the process of doing this any color cast will usually be removed. The resulting image will have a full tonal range, from pure black to pure white.

Here is a quick how to.


In this image of the Bow Bridge in Central Park, there is an overall warm cast, no black and no white in this image, making it appear dull and drab. In Photoshop, I start by creating an adjustment layer,


Select Threshold type,


giving me a layer that looks like this.


There is an adjustment slider that I will move left or right to find the threshold of black and white levels.


Next, I select the Color Sampler tool, and set the Tool Options to 11x11 average,


then I go back to the adjustment panel for the threshold layer and move the slider all the way to the left until the image turns completely white, then I move the slider slowly to the right until I start to see the first black areas,


sometimes it helps to zoom in so I can be sure to place my Color Sampler tool entirely in the black area,


it is important to reveal just the first area that shows up - the threshold of black - to ensure that I will get the smallest area of black. I use the Color Sampler eyedropper tool and click in the black area. This will leave a non-printing marker that will I will use later.

Now I repeat but this time moving the slider to the right to find the white point, dropping a marker on the white point. After selecting the two points I no longer need the threshold layer, so I can either turn it off or delete it.


Next I create another adjustment layer, either Curves or Levels. Either will provide eyedroppers that will be used to select the black and white points that I left reference markers on in the previous step. Using the black or topmost eyedropper to pick on the black point, and the bottom one to select the white point.


The image looks like this after setting the black and white points.


and for reference, this is the before view.


everything is more pleasing, there is a full range of tones, and the colors look better without the greenish/yellowish cast. Sometimes the effect is subtle, at other times it can be pretty dramatic. Hopefully you can use this technique to add a little more WOW! to your images.


Tuesday, March 27, 2012

Single Shot HDR - or How to Save Underexposed or Flat Images Using Tone Mapping

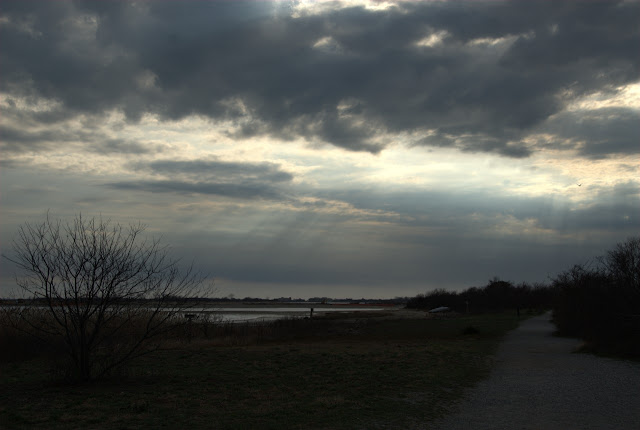
Went out this past Saturday and found myself at Jamaica Bay National Wildlife Refuge at the end of the day. The weather had been threatening rain all afternoon, but I took the chance to go there anyway. Aside from a nesting pair of Osprey, and a flock of Brants feeding at the shoreline, there was the sky. That kind of sky that you see before or after a storm. Bits of blue in the cloudless areas, the warm color of a soon-to-set sun reflecting off the numerous clouds, and a totally clear view of the whole spectacle - but my sights were set on the Osprey couple.

So I snapped off a few pictures without thinking. When I viewed the images on my computer, they looked pretty sad. The sky was correctly exposed, but everything else was drab and dreary. This was not at all how I remembered the scene, so I started thinking about how I might restore the original "feel" in the image.

There are a number of tools that can help you recover an underexposed image - Lucis Art, Topaz Adjust, the built-in tone mapping available in Photoshop - but I decided to use Photomatix Pro - mainly because I like the quality of the output and the relative ease with which I can get those results.

For a full description on how to use Photomatix Pro, look at my blogpost here. The process with a single image is similar to the one you would follow for a multiple image HDR after you merged the images into a single image. Basically you have two main options - Tonemapping and Exposure Fusion. The Tonemapping selection has two choices - Details Enhancer and Tone Compressor. I find the following workflow useful:


  1. After loading the image, select a preset that gets you closest to the "look" you are trying to achieve.
  2. Use "Strength" at close to 100% to  control how contrast will be affected by the subsequent adjustments.
  3. Set white point, black point, saturation and gamma to please your eye.
  4. Start making adjustments using smoothing, micro smoothing, contrast, microcontrast, luminosity etc - until you have gotten closer to your goal. 
  5. If you end up with halos, use highlight smoothing to remove them.
  6. Save and open the image in Photoshop - make whatever cropping, tone, contrast, color balance, sharpening and noise reduction adjustments you typically make. At this point you should be done. 


I have included several before and after examples below.


Wednesday, March 21, 2012

It's All About the Light . . .


I was asked to shoot an event this past weekend at a local restaurant - a sweet 16 party which included 110 guests. My thoughts directly went to what gear I would use and how I would do the lighting.

Available light shooting was out of the question - I was informed that the restaurant's dining room lighting level would be held low. I would have to use a fast zoom lens in any case, because a slower lens would have difficulty acquiring focus in such low light. I decided on an 18-50 F2.8 zoom for my D300, which gave me the flexibility of very wide to moderate telephoto, and would still be sharp at F2.8. But it would still not be fast enough to shoot available light, unless I used an ISO of 6400 or higher. The D300 image begins to look pretty crappy at ISOs higher than 800, so speedlight(s) would be the only logical choice.

Among the choices for lighting were on camera flash, which could be bounced for more even lighting, but I had hoped that I could do something a little different. I don't care for camera-positioned lighting because no matter what portable modifier you use, the quality of the light is flat and unappealing, with no contour-shaping shadows, except for that shadow that ends up under the chin and nose when you use those tall swiveling flash brackets that all the paparazzi use.  Another undesirable characteristic is flash shine - an area of perspiration-moistened or oily shiny skin that reflects more light, usually resulting in unflatteringly overexposed skin areas. With the expectation of shooting 100s of pictures there was no way I would spend days in Photoshop correcting shine.

I decided that the room was small enough to light the room with flash. It was time to mobilize the over half-dozen second-hand speedlights that I have collected over the years. All of them are made by Sunpak - 433D, 444D, 360D, and the venerable and highly sought after Auto 383. Each has a guide number of 120 making them as powerful as the best offered by Nikon or Canon these days. But more important - adjustable light output levels. I figured that with enough lights strategically placed I could illuminate the entire party room and keep the output levels low enough to be able to shoot the entire 4 hour event, take 400 images and not have to change the batteries.

I visited the restaurant the night before the event to check out possible locations for lighting. There were wall-mounted sconces that were large enough to conceal my lights, but they were too far from the ceilings. This distance is important since the light to subject is significantly greater when the light has the longer path to travel from the flash head to the ceiling then to the subjects. Also, there was a greater chance of getting the flash in the shot, which can work for dramatic effect if used judiciously, but definitely not ok for every other shot.This alternative was not going to work for me.


I decided to use super clamps to attach the speedlights and flash triggers to the chandeliers. With a little trial and error I was able to point the lights to cover the room with 7 speedlights, which left me one for the camera for low power fill. The ceiling-bounced flash was set to 1./4 power. This provided relatively short recycle times and low power consumption.

These were triggered with my favorite radio triggers, the Yongnuo RF602.


The quality of the indirect strobe lighting for all intents and purposes resembled available light -with some  wonderful benefits. Speedlights bounced off the ceilings spread light in all directions - softening up the shadows and providing lovely flattering light without any sign of harshness.


They freeze action by virtue of their short but intense burst of light. There would be no risk of motion blur. People were captured sharp and clear. No "tunnel effect" where the subjects are brightly lit and everything else is in dark shadow.


I could use a lower ISO (800) and still shoot at F5.6 - F8, the "sweet spot" for my lens as far as sharpness is concerned. And finally, I could take a long shot of the room and show all the people in it - none of that "tunnel" effect that is so common when camera mounted flash is your only source of light.

Below are two images. The first taken with a flash used with a bounce card mounted on a rotating bracket attached to the camera as the primary (key) light. The second utilizes the chandelier mounted flash bounced off the ceiling with a tiny amount of fill light from a camera-mounted flash using a bounce card. The power level on the camera's flash was either 1/8 or 1/16.


You can see the difference - the girls in the lower image have softer features, you can see highlights in their hair, and the lighting is a bit more interesting.  The upper image has harsh lighting, the hair gets absorbed by the dark background, and there is that deep dark shadow under the chin and in the eye sockets.

This lighting approach cannot be used in all situations - sometimes the room is just too large, or the ceilings are too high. This demands some other form of bounce lighting, perhaps with more powerful monolights with radio or optical triggers, umbrellas or softboxes, etc. But for this application, the little guys were perfect, and everything worked out just fine.